This manual will present basic instructions and definitions so that the user will be able to load classes onto the PantherNet system. The manual has two main sections: Credit and Noncredit. An equally important part of class scheduling is understanding the policies and procedures of class scheduling, which is located in Section D of this manual. It is assumed that the user has basic knowledge as to navigating in the PantherNet system. Please note that the example screens used in this manual do not reflect actual classes or instructor information.
COVID19 Scheduling Response
Effective Fall 2020
Updating Classes for Fall that are Moving to Remote Instruction and Distance Learning.
Update the class notes and add appropriate special designators and fees:
Modify the class and add appropriate special designators, fees and notes as follows, depending upon the type of class:
- Class was in the classroom 100%; determine if A or B applies:
- Class is being converted to a fully online class – add appropriate special designators (DL, WP) approved online class notes from Academic Services. To that note, add the following: “This class has been converted from face-to-face to online instruction.” (Please note: instructor must meet criteria for being approved for a fully online class.) Updates course schedule line(s) modifying days, times, building and room to ONLINE (see Class Scheduling Manual).
- Class is being converted to remote instruction – add special designators (GB, T7) to the class, and apply class note RI (Remote Instruction - already in PantherNet). You will need to add the print indicator B to the three lines of the class note. There are RI note versions for credit and noncredit. Leave the class schedule line as far as days, times, and dates, but convert building and classroom to TBA. Add the special fee COMP - this adds the special fee to the class at a flat $10 per class. Other course special fees can remain. Please email Ginger Pedersen or Maria Lopez if the class does not allow the adding of the COMP fee. In that case, we will update the course dictionary.
- Special for Bachelor’s classes taught fully online (not remote instruction) by adjuncts – use special designator combination of (DL, BA).
- If the class you are updating had a class note, you must manually add the note about remote instruction to the bottom of the existing note:
This class has been converted from face-to-face___
to remote instruction. Please see the Web page at___
https://tinyurl.com/rysbakt for more information___
- Class was a hybrid class converting to remote instruction:
- Remove the HY or WH special designator.
- Determine if A or B applies under number 1 above. Remove the existing class note and replace with the appropriate note A or B under number 1.
Please note: a traditional Hybrid class can remain where the part that was in the classroom can be moved to remote instruction, and the other half of the class is online. Please contact eLearning for more information.
- Class was a component class converting to remote instruction:
- Remove the WC special designator.
- Determine if A or B applies under number 1 above. Remove the existing class note and replace with the appropriate note A or B under number 1.
- The COMP fee should already be on the class.
May 11, 2020
Version 1.0, GLP
Credit Classes
Overview
The class scheduling facilities in PantherNet are divided into two main functions: Credit and Noncredit. Although the functions in loading credit and noncredit classes are much alike, a few differences will be noted as each screen function is explained below. The credit module consists of five panels while the noncredit module consists of six panels. Each panel records a different type of information. This section will review credit class scheduling.
Credit Class Scheduling
Below is an overview of each of the panels:
Panel 1 – This is the primary entry panel where most information is entered such as the course number, campus, session, account number, facility and room, times and dates.
Panel 2 – This is the panel where special designators, subject areas, and schedule notes are added
Panel 3 – Special Fees
Panel 4 – “Stacked” (concurrent) classes
Panel 5 – Detail facility and room coding and class schedule exceptions
Creating a Credit Class Schedule On-line
What you’ll need to complete the task:
Completed Credit Class and Schedule Add/Modify/Purge Form (as developed at the individual campus level)
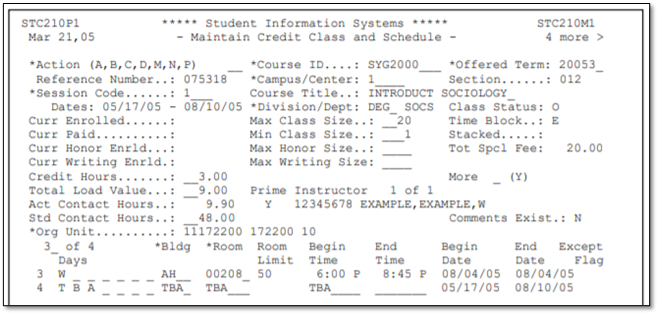
Figure 1 – Panel 1 - Primary Entry Panel for Credit Classes
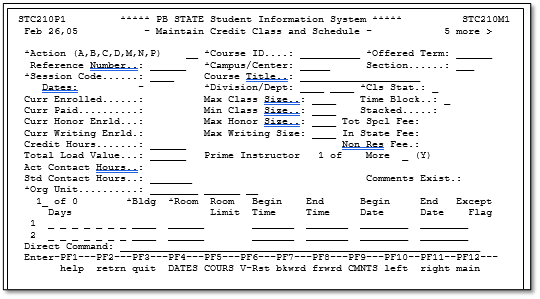
Step-by-Step Instructions for Adding a New Section of a Credit Course
Fields for Entry
The following fields need to be entered in the order given:
Direct Command: CU CC MC
- Select the ACTION CODE: A (Add)
- Course ID – Type the course ID (course number) of the course to be loaded, press the <TAB> key.
- Offered Term – Type the term identifier for the class, press the <TAB> key.
- Campus/Center – Select or type the appropriate campus that is offering the class (Note: if the class is being offered off-site, select the appropriate off-site number for the sponsoring campus. It will end in a 9).
- Press the <F5> key to load the course dictionary information. Press the <TAB> key five times.
- Session Code – Select or type the appropriate session that the class is being held in (e.g., Main, Express, 12-week). Please see Section D of this manual for detailed instructions on selecting a session. Press the <TAB> key.
- Division/Dept – No changes are needed; press <TAB> key twice.
- Class Status – The default value is “O” for open. If you temporarily do not want enrollments in the class, change this value to “H” for hold. Do not change to “U” for unavailable (class add date has passed) – the system will automatically update this field to “U” when the drop/add period for the class has expired. To cancel a class, change to “C” for cancel. Press the <TAB> key.
- Max Class Size – Enter the maximum class size (class limits). Please see the academic affairs class size guidelines policy manual in Section G of this manual for the assigned class size. This will later edit against the facility and room you have chosen to see if the room can meet this capacity.
- Time Block – This field will automatically be filled-in when the times are entered. The values are “D” for day, “E” for evening, “W” for weekend and “O” for other (classes with TBA in time). Note: Classes that start at 5:00 p.m. Monday through Thursday are labeled as “E” Evening; classes that begin at 5:00PM on Friday are labeled as “W” Weekend). For fully online classes, enter a “V” in this field – this will load the information on Days, Bldg./Room and Time automatically. Press the <TAB> key.
- Min Class Size – The default value is 1; enter a different minimum class size if appropriate. Press the <TAB> key.
- Max Honor Size – Enter the maximum number of honors students for this class (if applicable – only used for Honors Sections); press the <TAB> key.
- Max Writing Size – This field is currently not used; press the <TAB> key.
- Credit Hours – no changes are necessary in this field; press the <TAB> key.
- Load Value – this field is the equivalent of “points” for instructor load, and is loaded from the course dictionary – no changes are needed; press the <TAB> key
- STD Contact Hours – These are the standard class hours from the course dictionary (e.g., one credit hour=16 contact hours). Remember that each hour in credit is actually 50 minutes; press the <TAB> key.
- Org Unit – This is the organizational unit account number to which course costs will be charged. The account and qual-1 are automatically loaded from the course dictionary record. Type in the correct campus number. Press the <TAB> key 4 times.
- Days – Type in the days of the week that the class will be held, using the following abbreviations:
M (Monday)
|
T (Tuesday)
|
W (Wednesday)
|
R (Thursday)
|
F (Friday)
|
S (Saturday)
|
| U (Sunday) |
If the class is held on different times on different days, you can use the additional lines provided. If the class is TBA on the day field, type TBA in the first three positions for the days. For a fully online class, once the V is entered on Time Block, this field will display as ONLINE. Please remember that you cannot use TBA in days if you are using a “special” session (see Section D for details). Tab to the “BLDG” field.
- BLDG – Type in the letter designator for the building you are choosing. If the class building is TBA, type TBA on the building designator and room. Press the <TAB> key.
- Room – Type in the room number. If the building is TBA, room field must also be TBA. Press the <TAB> key.
- Begin Time – Enter the begin time for the class. The format for time entry is abbreviated such as 7P for 7:00 p.m. or 820A for 8:20 a.m. If time is TBA, type “TBA” in begin time field. Please remember that you cannot use TBA in times if you are using a “special” session (see Section D). Press the <TAB> key.
- End Time – Enter the end time for the class. If the class start time is TBA, leave this field blank.
Do not press enter until you have checked to see if the class needs any additional panels of information filled in.
Checklist for Additional Data Needed for a Credit Class
| |
Yes |
| Should this class be restricted from auditing? |
Panel 2 |
| Does this class require a special designator? |
Panel 2 |
| Is the class an e-learning class? |
Panel 2 |
| Do I need a schedule note for the student schedule? |
Panel 2 |
| Do I need to change the email type for the student? |
Panel 2 (please click here.) |
| Does the class have a special fee? |
Panel 3 |
| Is this a stacked (concurrent) class? |
Panel 4 |
| Does the class meet for additional meetings or days? |
Panel 5 |
Figure 2 - Panel 2 – Special Designators and Schedule Notes
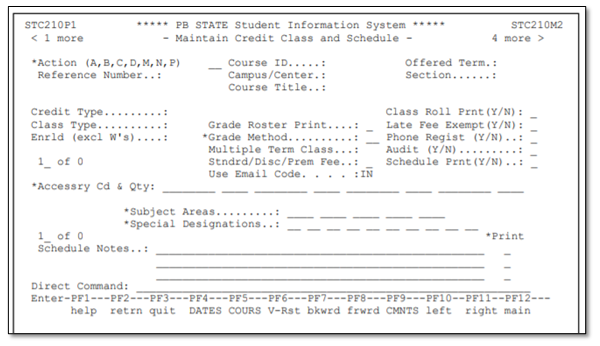
- Restricting a Class from Auditing – Panel 2
Certain classes (such as college prep) cannot be audited. To restrict as class from being audited, change the field labeled “Audit” to “Y”.
- Class Requires a Special Designator contains the current special designators. For detailed instructions on their proper usage, please see Section D of this manual.
- Loading an Internet Class (Section Type) – Panel 2 To indicate that a class is delivered through technology the Special Designators field(s) must be filled in. Refer to the list of the current special designators and Section D of this manual for more information on using special designators for e-learning.
- Schedule Notes – Panel 2
If you need a special note or comment to print on the student’s schedule, type in the comment on the “schedule notes” line and place a “B” in the print field on the right side of the screen. The additional fields are available for internal notes, if no “B” is indicated the note will not print on the student’s schedule. Please see Section D of this manual for detailed instructions on class notes.
Course Special Designators
as of May 2020
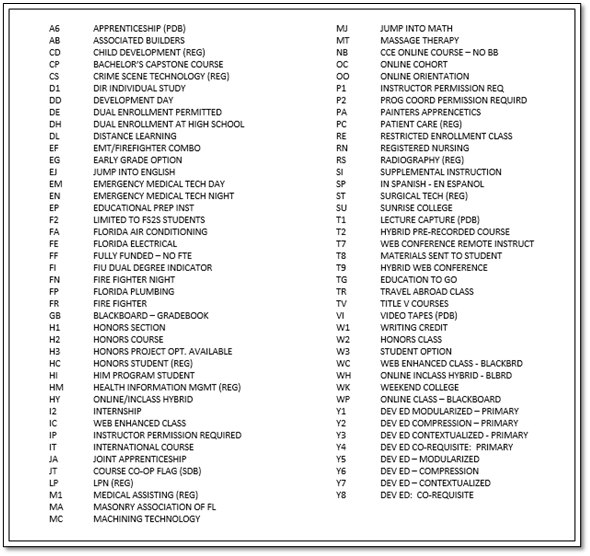
Figure 3 - Panel 3 – Special Fees
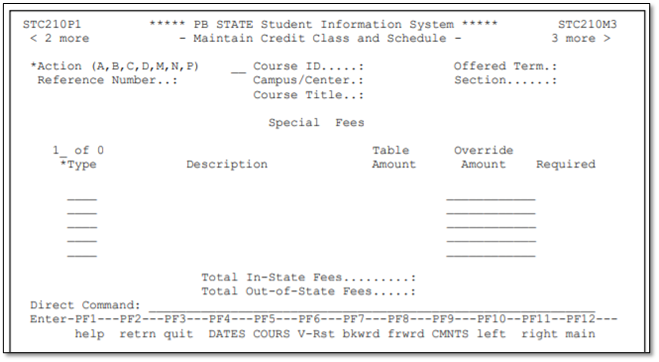
- Class with Special Fees – Panel 3
If the class has special fees, they would be listed on panel 3. These fees cannot be modified or waived. Please see Section N – e-learning for special instructions on e-learning fees.
Figure 4 – Panel 4 – Stacked Classes (Concurrent Classes)
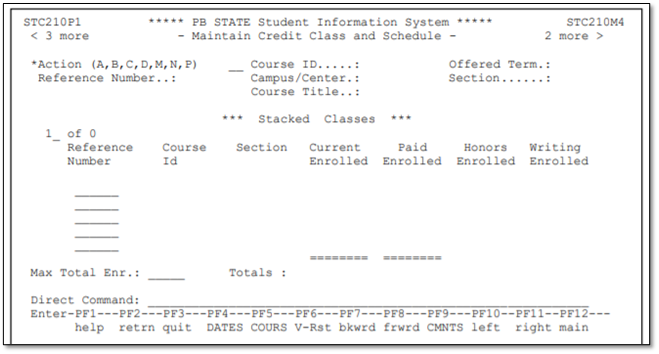
- Stacked (concurrent classes) – Panel 4
If the class meets concurrently with another class in the same room, the system will return the message “Time conflict found with class [ref]” ,where the [ref] is equal to the reference number of the class meeting at the same time in the same room. If this is the correct reference number for the concurrent class, move to panel 4 using the <F11> key and enter the reference number of the concurrent class.
Figure 5 - Panel 5 – Schedule Exceptions
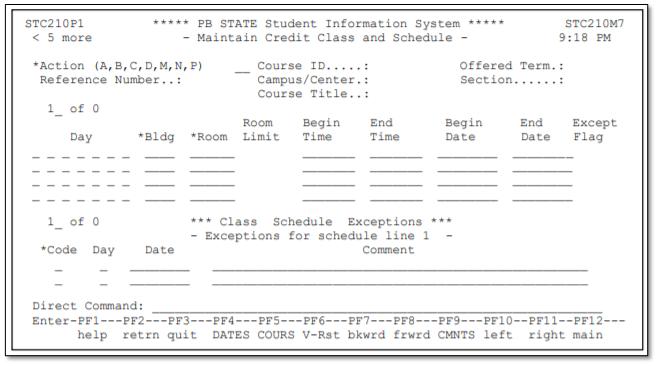
- Class meets for Additional Days – Panel 5
If a class meets for additional days outside the normal meeting days or on a closed day, fill in the dates and times of the additional class meetings. Use an “N” code to indicate the date on which the class will not meet, or use a “V” to indicate a variance in the meeting day (example – class will meet on a Tuesday instead of Monday).
Final Steps for Credit Class Entry:
After you have determined that all additional information has been entered on the panels (or that no additional information was necessary), press <ENTER>. The data you have entered will then be edited for accuracy using the programmed logic. Correct any data that the program edits as invalid. When all the data have passed the edits, you will be transported to the screen where you will make the instructor assignment. By default, the instructor schedule associated with the class has been loaded as TBA; you can leave the class as TBA or you can choose an instructor. Once you hit enter, the screen on page C-8 is displayed. Information on how to change an instructor once the class has been loaded is located in the specialized procedures of this section.
Adding an Instructor to a Class (initial class entry)
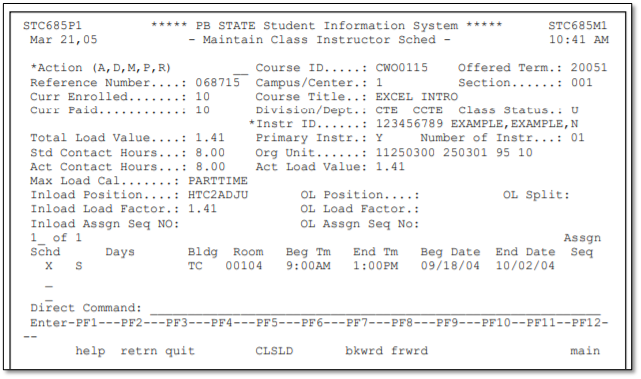
Figure 6 – Maintain Class Instructor Schedule
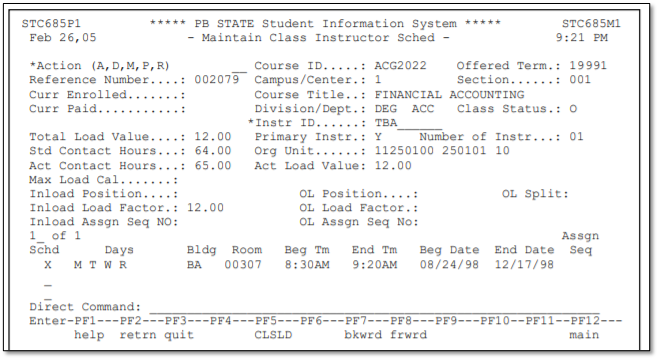
- Select the ACTION CODE: R (replace); press the <TAB> key
- On the field INSTR ID, press the <F1> key and select the appropriate instructor; if the instructor on the form is not listed, then the instructor has not been approved through Instructor Resource Management to teach the class then the class must remain TBA.
- If the instructor’s name is found, move your cursor and place it on the same line as the instructor’s name and press <ENTER>. Press <ENTER> again to replace the instructor. (For detailed instructions on how to replace an existing instructor, see section C.
That’s It – You Have Now Successfully Loaded a Credit Class Schedule!
Non-Credit Class Scheduling
Below is an overview of each of the panels:
Panel 1 – This is the primary entry panel where most information is entered such as the course number, campus, session, account number, facility and room, times and dates.
Panel 2 – This is the panel where coordinator codes, special designators, subject areas, and schedule notes are added
Panel 3 – Special Fees
Panel 4 – “Stacked” (concurrent) classes
Panel 5 – Calculated session dates for classes
Panel 6 – Detail facility and room coding and class schedule exceptions
Creating a Noncredit Class Schedule On-Line
What you’ll need to complete the task:
Completed Noncredit class and Schedule Add/Modify/Purge Form (to be developed at the individual campus level)
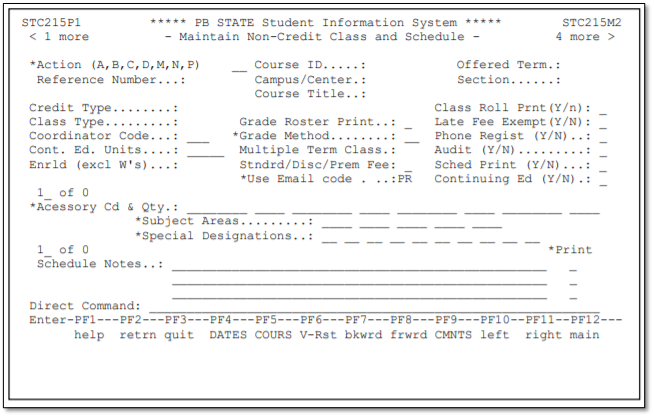
Figure 7– Panel 1 – Primary Entry Panel for Noncredit Classes
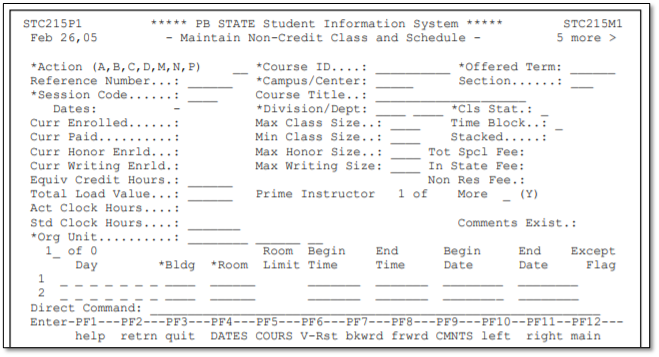
Step-By-Step Instructions for Adding a New Section of a Noncredit Class
Fields for Entry
The following fields need to be entered in the order given:
Direct Command: CU CC MN
- Select the ACTION CODE: A (Add)
- Course ID – Type the course ID (course number) of the course to be loaded, press the <TAB> key.
- Offered Term – Type the term identifier for the class, press the <TAB> key.
- Campus/Center – Select or type the appropriate campus that is offering the class (Note: if the class is being offered off-site, select the appropriate off-site number for the sponsoring campus).
- Press the <F5> key to load the course dictionary information. Press the <TAB> key five times.
- Session Code – Select the appropriate session (see Section D of this manual for detailed information on selecting sessions). Press the <TAB> key.
- Division/Dept – No changes are necessary; press <TAB> key twice.
- Class Status – The default value is “O” for open. If you temporarily do not want enrollments in the class, change this value to “H” for hold. Do not change the class to “U” for unavailable – the system will update the class to “U” once the drop and add period has expired. To cancel a class, change to “C” for cancel. Press the <TAB> key.
- Max Class Size – Enter the maximum class size (class limits). This will later edit against the facility and room you have chosen to see if the room can meet this capacity.
- Time Block – This field will automatically be filled-in when the times are entered. The values are “D” for day, “E” for evening, “W” for weekend and “O” for other. Enter “V” for an online class, which will automatically then populate the Days, Bldg./Room and time fields. Press the <TAB> key.
- Min Class Size – Enter “1” or a different minimum class size if appropriate. Press the <TAB> key.
- Max Honor Size – (This field is not used at Palm Beach State); press the <TAB> key.
- Max Writing Size – (This field is not used at Palm Beach State); press the <TAB> key.
- Equiv. Credit Hours – no changes are necessary in this field; press the <TAB> key.
- Load Value – this field is the equivalent of “points” from the course dictionary – no changes are necessary; press the <TAB> key
- STD Contact Hours – These are the standard class hours from the course dictionary; press the <TAB> key.
- Org Unit – This is the organizational unit account number to which course costs will be charged. Please complete the account number that loads from the course dictionary by adding the campus indicator. Press the <TAB> key 4 times.
- Days – Type in the days of the week that the class will be held, using the following abbreviations:
M (Monday)
|
T (Tuesday)
|
W (Wednesday)
|
R (Thursday)
|
F (Friday)
|
S (Saturday)
|
| U (Sunday) |
If the class is held on different times on different days, you can use the additional lines provided. If the class is TBA on the day field, type TBA in the first three positions for the days. Please remember that in order to use the “special” sessions, you cannot have TBA in days – see Section D of this manual. Tab to the “BLDG” field.
- BLDG – Type in the letter designator for the building you are choosing (A complete list of building designators and new building designators at each campus can be found in Appendix B). If the class building is TBA, type TBA on the building designator and room. Press the <TAB> key.
- Room – Type in the room number. If the building is TBA, leave room field blank. Press the <TAB> key.
- Begin Time – Enter the begin time for the class. The format for time entry is abbreviated such as 7P for 7:00 p.m. or 820A for 8:20 a.m. If time is TBA, type “TBA” in begin time field and end time field. Please remember that in order to use the “special” sessions, you cannot have TBA in days – see Section D of this manual. Press the <TAB> key.
- End Time – Enter the end time for the class. If the class has TBA in the begin time field, you may leave this field blank.
Do not press enter until you have checked to see if the class needs any additional panels of information:
| Checklist for Additional Data Needed for a Noncredit Class |
Yes |
| 1. Do I need to capture the coordinator’s code? |
Panel 2 |
| 2. Does this class require a special designator? |
Panel 2 |
| 3. Is the class an e-learning class (i.e., TV, Internet)? |
Panel 2 |
| 4. Do I need a schedule note for the student schedule? |
Panel 2 |
| 5. Do I need to change the email type? |
Panel 2 (please click here.) |
| 6. Does the class have a special fee? |
Panel 3 |
| 7. Is this a stacked (concurrent) class? |
Panel 4 |
| 8. Does the class meet for additional meetings or days? |
Panel 5 |
Figure 8- Panel 2 – Special Flags and Designators
- Coordinator Code – Panel 2
Enter the coordinator’s code number in the field, if applicable (for CWE or Avocational classes only).
- Special Designator - Section D contains the current special designators. For detailed explanation on their proper usage, please see Section D of this manual.
- Loading a TV or Internet Class (Section Type) – Panel 2
To indicate that a class is delivered through technology or is being tagged in some way, the Special Designators field(s) must be filled in. The class must be pre-approved at the course dictionary level for the delivery method. The listing of special designators is in Section D including information on e-Learning special designators.
- Schedule Notes – Panel 2
If you need a special note or comment to print on the student’s schedule, type in the comment on the “schedule notes” line and place a “P” in the print field on the right side of the screen. The additional fields are available for internal notes, if no “P” is indicated the note will not print on the student’s schedule. Please see Section D of this manual for detailed instructions on class schedule notes.
Figure 9–Panel 3 – Special Fees
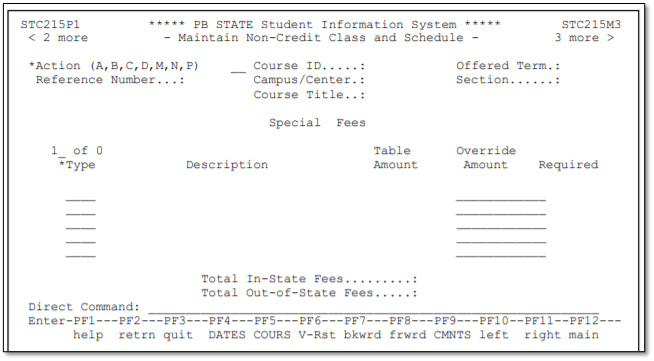
- Special Fees
If a class has a special fee attached, it will show on this panel, and cannot be modified or changed.
Figure 10– Panel 4 – Stacked Classes
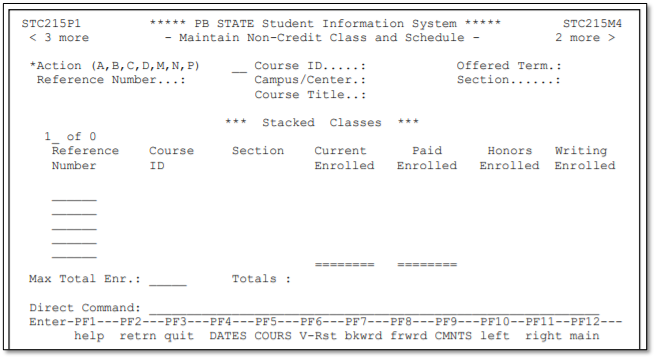
- Stacked (concurrent classes) – Panel 4
If the class meets concurrently with another class in the same room, the system will return the message “Time conflict found with class [ref]” where the [ref] is equal to the reference number of the class meeting at the same time in the same room. If this is the correct reference number for the concurrent class, move to panel 4 using the <F11> key and enter the reference number of the concurrent class.
Figure 11– Panel 6 – Class Schedule Exceptions
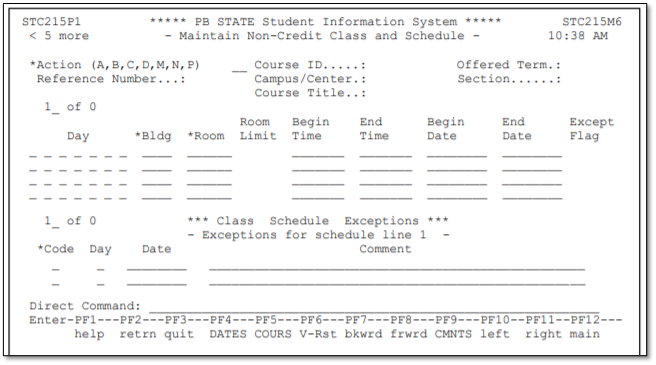
- Class meets for Additional Days – Panel 6
If a class meets for additional days outside the normal meeting days or on a closed day, fill in the dates and times of the additional class meetings. Use an “N” code to indicate the date on which the class will not meet, or use a “V” to indicate a variance in the meeting day (example – class will meet on a Tuesday instead of Monday).
Final Steps for Noncredit Class Entry:
After you have determined that all additional information has been entered on the panels (or that no additional information was necessary), press <ENTER>. The data you have entered will then be edited for accuracy using the programmed logic. Correct any data that the program edits as invalid. When all the data have passed the edits, you will be transported to the screen where you will make the instructor assignment. By default, the instructor schedule associated with the class has been loaded as TBA; you will need to assign an instructor now, or later when the instructor has been assigned.
Figure 12 - Maintain Class Instructor Schedule
- Select the ACTION CODE: R (replace); press the <TAB> key
- On the field INSTR ID, press the <F1> key and select the appropriate instructor; if the instructor on the form is not listed, then the instructor has not been approved through Instructor Resource Management to teach the class and the class must remain TBA.
- If the instructor’s name is found, move your cursor and place it on the same line as the instructor’s name and press <ENTER>. Press <ENTER> again to replace the instructor. (For detailed instructions on how to replace an existing instructor once assigned, please refer to Specialized Procedures for Credit and Non-Credit Classes.
That’s It – You Have Now Successfully Loaded a Non-Credit Class Schedule!
Specialized Procedures for Credit and Noncredit Classes
How to Replace an Instructor
The PantherNet system allows you to replace an instructor on a class with another instructor or change the instructor to TBA. Please note that the procedure outlined here must only be used if the instructor being replaced has not taught any hours of the class. If the instructor has taught some hours of the class but someone else is finishing the class, refer to “Assigning Multiple Instructors” below.
Credit Direct Command: CU CC MC
Noncredit Direct Command:CU CC MN
- Find the class schedule you need to change by using browse or typing in the reference number.
- Change the ACTION CODE field to M (modify)
- Tab to the MORE field; type “Y” in that field and press< ENTER>.
- A screen will appear (Figure 13) that shows all instructors currently assigned to that class; move your cursor to the line adjacent to the instructor you wish to replace and place an “R” in that field. This can be a person’s name or a TBA instructor.
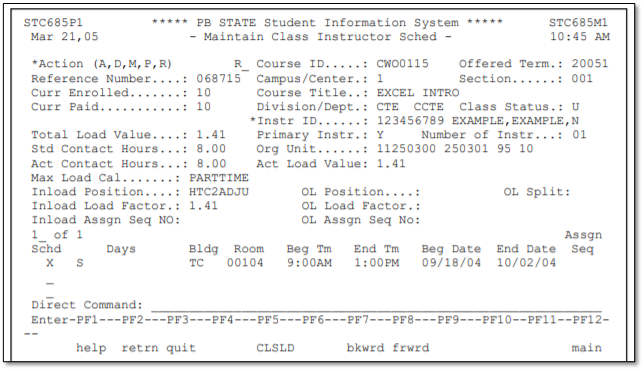
- The Maintain Class Instructor Screen is displayed (Figure 14); tab to the INSTR ID field and select another instructor or change the field to TBA by clearing the field using the <END> key and typing TBA.
Figure 13 – Browse on Class Instructors
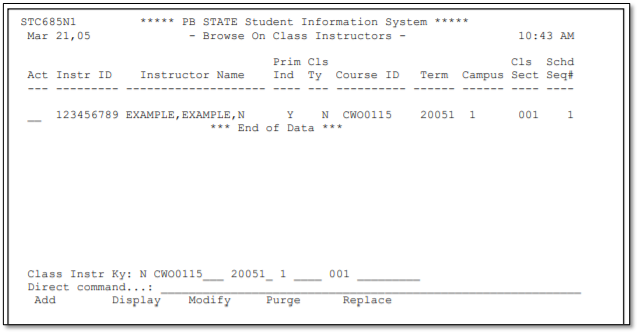
Figure 14 – Maintain Class Instructor
Assigning Multiple Instructors to a Class
There are many instances in which you will need to have more than one person assigned to a class: team-teaching (more than one person teaching at the same time), multiple instructors (when several different people teach parts of the course) or when an instructor is replaced after having taught some hours in the class.
Credit Direct Command: CU CC MC
Noncredit Direct Command: CU CC MN
- Find the class schedule you need to change by using browse or typing in the reference number.
- Change the ACTION CODE field to M (modify)
- Tab to the MORE field; type “Y” in that field and press enter.
- A screen will appear (Figure 13) that shows all instructors currently assigned to that class; move your cursor to the line adjacent to the instructor you wish to replace and place an “A” in that field. This can be a person’s name or a TBA instructor.
- The Maintain Class Instructor Screen is displayed (Figure 14). On the field INSTR ID, press the <F1> key and select the appropriate instructor.
- If the instructor’s name is found, move your cursor and place it on the same line as the instructor’s name and press <ENTER>. Press <ENTER> again to add the instructor.
- Only one instructor can be the “primary” instructor (instructor of record). If you want the person who was originally assigned the class to the primary instructor, press<ENTER> to finish the transaction. If you want the additional added instructor to be the primary instructor, tab to the PRIMARY INSTR field on (Figure 14) and type a “Y” in the field.
- The last step is to select the standard days and times of the original class schedule or select the actual days that the secondary instructor is teaching. For example, a secondary instructor may be teaching on Wednesdays of a Monday- Wednesday class. If you want to select the default schedule, place and “X” on the line next to the schedule (Figure 14). If you want to create a specialized schedule, type in the days and dates that the secondary instructor is teaching.
- Remember to adjust faculty loads (if required) through the IRM process outlined Section E of this manual.
Removing an Instructor from a Multiple Instructor Class
If you need to remove an instructor from a class, follow the procedure below. Please note that an instructor should not be removed from a class if they have been paid any money associated with the course. An instructor should only be removed if they did not teach any hours of the course.
- Find the class schedule you need to change by using browse or typing in the reference number.
- Change the ACTION CODE field to “M” (modify)
- Tab to the MORE field; type “Y” in that field and press enter.
- A screen will appear (Figure 13) that shows all instructors currently assigned to that class; move your cursor to the line adjacent to the instructor you wish to remove and type a “P” (purge).
- The Maintain Class Instructor Screen is displayed (Figure 14). The instructor you wish to purge is displayed on the screen, press <ENTER> to confirm the purge. Please note that you cannot purge a primary instructor when other instructors are attached to the class.
- Remember to adjust faculty loads (if applicable) through the IRM process outlines in Section E of this manual.
Scheduling Rooms for e-Learning Courses
Some e-Learning courses only meet a few times during the semester on campus. These rooms can be reserved through class loading.
To reserve rooms for specific days, follow the example below:
- Type in all required class information
- In the bottom of the schedule, on line 1, type in the building, room, begin time, end time, and dates of the first meeting. Continue using as many schedule lines as are necessary to schedule all needed class meetings.
- When all class meetings have been entered, add one additional schedule line with TBA in days, TBA in building and room, TBA in time and the full class begin and end dates.
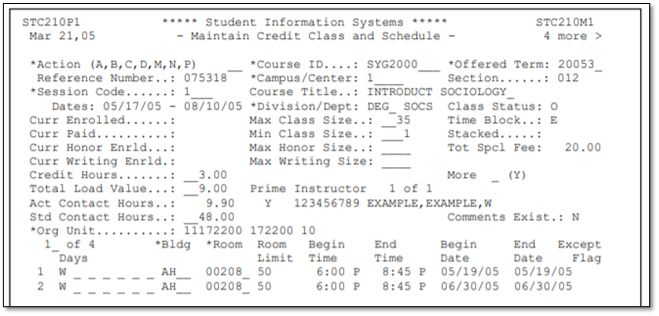
Figure 15 – Scheduling e-Learning that meets at least one time on campus
All rooms have now been reserved on the days and times needed for the e-Learning class. It is critical that e-Learning courses be scheduled in this manner for state reporting purposes. Please use the appropriate special designator code to indicate what type of e-Learning class is being held or see Section D of this manual for detailed instructions on e-Learning.
Special Procedures for using Student Email Address in Classes
Credit Classes:
Palm Beach State College added an additional field on panel 2 that controls the type of student email address used on a class. The default email address for students in credit classes is “IN” for Institutional Email Address (Palm Beach State assigned student email address). The email address for students may be changed to “PR” for personal email address with permission of the appropriate academic dean or their designee. Value can only be changed if no students have registered for class.
Noncredit Classes:
Palm Beach State College added an additional field on panel 2 that controls the type of student email address used on a class. The default email address for students in noncredit classes is “PR” for personal email address. The email address for students may be changed to “IN” for Institutional Email Address (Palm Beach State assigned student email address) with permission of the appropriate academic dean or their designee. Value can only be changed if no students have registered for class.