Non-Credit Class Scheduling
Below is an overview of each of the panels:
Panel 1 – This is the primary entry panel where most information is entered such as the course number, campus, session, account number, facility and room, times and dates.
Panel 2 – This is the panel where coordinator codes, special designators, subject areas, and schedule notes are added
Panel 3 – Special Fees
Panel 4 – “Stacked” (concurrent) classes
Panel 5 – Calculated session dates for classes
Panel 6 – Detail facility and room coding and class schedule exceptions
Creating a Noncredit Class Schedule On-Line
What you’ll need to complete the task:
Completed Noncredit class and Schedule Add/Modify/Purge Form (to be developed at the individual campus level)
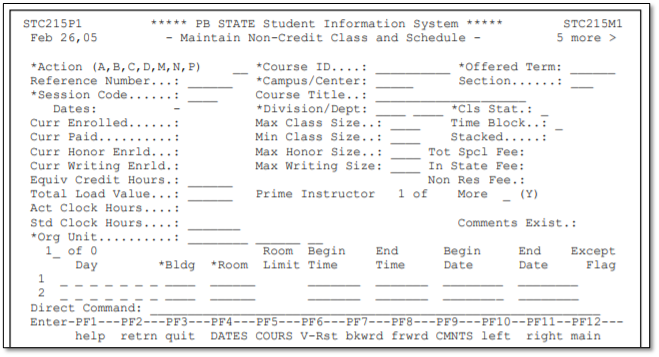
Figure 7– Panel 1 – Primary Entry Panel for Noncredit Classes
Step-By-Step Instructions for Adding a New Section of a Noncredit Class
Fields for Entry
The following fields need to be entered in the order given:
Direct Command: CU CC MN
- Select the ACTION CODE: A (Add)
- Course ID – Type the course ID (course number) of the course to be loaded, press the <TAB> key.
- Offered Term – Type the term identifier for the class, press the <TAB> key.
- Campus/Center – Select or type the appropriate campus that is offering the class (Note: if the class is being offered off-site, select the appropriate off-site number for the sponsoring campus).
- Press the <F5> key to load the course dictionary information. Press the <TAB> key five times.
- Session Code – Select the appropriate session (see Section D of this manual for detailed information on selecting sessions). Press the <TAB> key.
- Division/Dept – No changes are necessary; press <TAB> key twice.
- Class Status – The default value is “O” for open. If you temporarily do not want enrollments in the class, change this value to “H” for hold. Do not change the class to “U” for unavailable – the system will update the class to “U” once the drop and add period has expired. To cancel a class, change to “C” for cancel. Press the <TAB> key.
- Max Class Size – Enter the maximum class size (class limits). This will later edit against the facility and room you have chosen to see if the room can meet this capacity.
- Time Block – This field will automatically be filled-in when the times are entered. The values are “D” for day, “E” for evening, “W” for weekend and “O” for other. Enter “V” for an online class, which will automatically then populate the Days, Bldg./Room and time fields. Press the <TAB> key.
- Min Class Size – Enter “1” or a different minimum class size if appropriate. Press the <TAB> key.
- Max Honor Size – (This field is not used at Palm Beach State); press the <TAB> key.
- Max Writing Size – (This field is not used at Palm Beach State); press the <TAB> key.
- Equiv. Credit Hours – no changes are necessary in this field; press the <TAB> key.
- Load Value – this field is the equivalent of “points” from the course dictionary – no changes are necessary; press the <TAB> key
- STD Contact Hours – These are the standard class hours from the course dictionary; press the <TAB> key.
- Org Unit – This is the organizational unit account number to which course costs will be charged. Please complete the account number that loads from the course dictionary by adding the campus indicator. Press the <TAB> key 4 times.
- Days – Type in the days of the week that the class will be held, using the following abbreviations:
M (Monday)
|
T (Tuesday)
|
W (Wednesday)
|
R (Thursday)
|
F (Friday)
|
S (Saturday)
|
| U (Sunday) |
If the class is held on different times on different days, you can use the additional lines provided. If the class is TBA on the day field, type TBA in the first three positions for the days. Please remember that in order to use the “special” sessions, you cannot have TBA in days – see Section D of this manual. Tab to the “BLDG” field.
- BLDG – Type in the letter designator for the building you are choosing (A complete list of building designators and new building designators at each campus can be found in Appendix B). If the class building is TBA, type TBA on the building designator and room. Press the <TAB> key.
- Room – Type in the room number. If the building is TBA, leave room field blank. Press the <TAB> key.
- Begin Time – Enter the begin time for the class. The format for time entry is abbreviated such as 7P for 7:00 p.m. or 820A for 8:20 a.m. If time is TBA, type “TBA” in begin time field and end time field. Please remember that in order to use the “special” sessions, you cannot have TBA in days – see Section D of this manual. Press the <TAB> key.
- End Time – Enter the end time for the class. If the class has TBA in the begin time field, you may leave this field blank.
Do not press enter until you have checked to see if the class needs any additional panels of information:
| Checklist for Additional Data Needed for a Noncredit Class |
Yes |
| 1. Do I need to capture the coordinator’s code? |
Panel 2 |
| 2. Does this class require a special designator? |
Panel 2 |
| 3. Is the class an e-learning class (i.e., TV, Internet)? |
Panel 2 |
| 4. Do I need a schedule note for the student schedule? |
Panel 2 |
| 5. Do I need to change the email type? |
Panel 2 (please click here.) |
| 6. Does the class have a special fee? |
Panel 3 |
| 7. Is this a stacked (concurrent) class? |
Panel 4 |
| 8. Does the class meet for additional meetings or days? |
Panel 5 |
Figure 8- Panel 2 – Special Flags and Designators
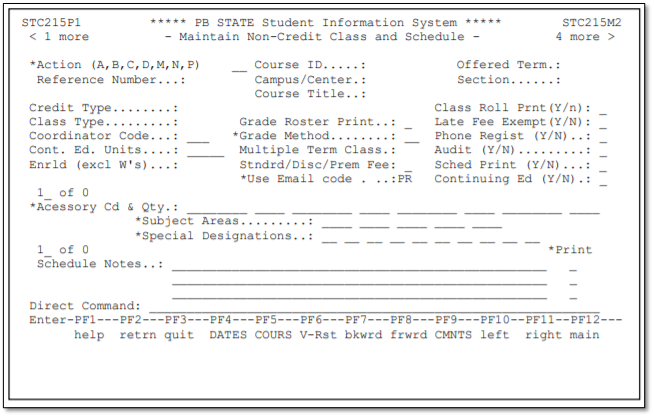
- Coordinator Code – Panel 2
Enter the coordinator’s code number in the field, if applicable (for CWE or Avocational classes only).
- Special Designator - Section D contains the current special designators. For detailed explanation on their proper usage, please see Section D of this manual.
- Loading a TV or Internet Class (Section Type) – Panel 2
To indicate that a class is delivered through technology or is being tagged in some way, the Special Designators field(s) must be filled in. The class must be pre-approved at the course dictionary level for the delivery method. The listing of special designators is in Section D including information on e-Learning special designators.
- Schedule Notes – Panel 2
If you need a special note or comment to print on the student’s schedule, type in the comment on the “schedule notes” line and place a “P” in the print field on the right side of the screen. The additional fields are available for internal notes, if no “P” is indicated the note will not print on the student’s schedule. Please see Section D of this manual for detailed instructions on class schedule notes.
Figure 9–Panel 3 – Special Fees
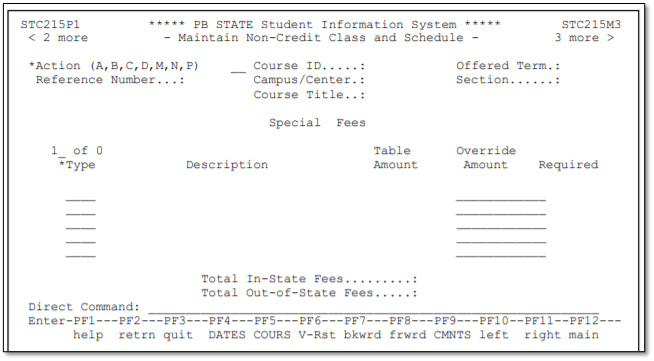
- Special Fees
If a class has a special fee attached, it will show on this panel, and cannot be modified or changed.
Figure 10– Panel 4 – Stacked Classes
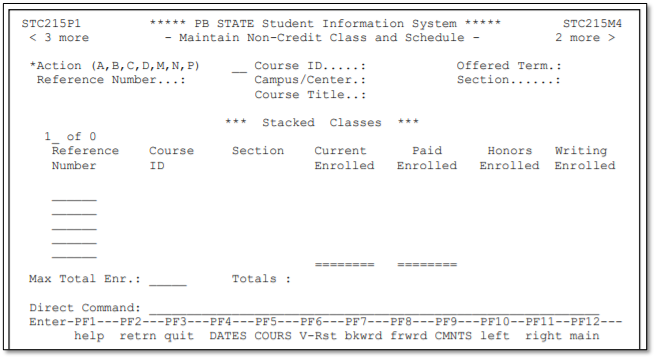
- Stacked (concurrent classes) – Panel 4
If the class meets concurrently with another class in the same room, the system will return the message “Time conflict found with class [ref]” where the [ref] is equal to the reference number of the class meeting at the same time in the same room. If this is the correct reference number for the concurrent class, move to panel 4 using the <F11> key and enter the reference number of the concurrent class.
Figure 11– Panel 6 – Class Schedule Exceptions
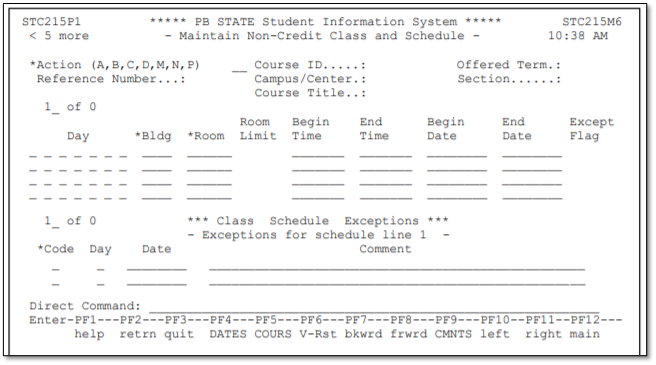
- Class meets for Additional Days – Panel 6
If a class meets for additional days outside the normal meeting days or on a closed day, fill in the dates and times of the additional class meetings. Use an “N” code to indicate the date on which the class will not meet, or use a “V” to indicate a variance in the meeting day (example – class will meet on a Tuesday instead of Monday).
Final Steps for Noncredit Class Entry:
After you have determined that all additional information has been entered on the panels (or that no additional information was necessary), press <ENTER>. The data you have entered will then be edited for accuracy using the programmed logic. Correct any data that the program edits as invalid. When all the data have passed the edits, you will be transported to the screen where you will make the instructor assignment. By default, the instructor schedule associated with the class has been loaded as TBA; you will need to assign an instructor now, or later when the instructor has been assigned.
Figure 12 - Maintain Class Instructor Schedule
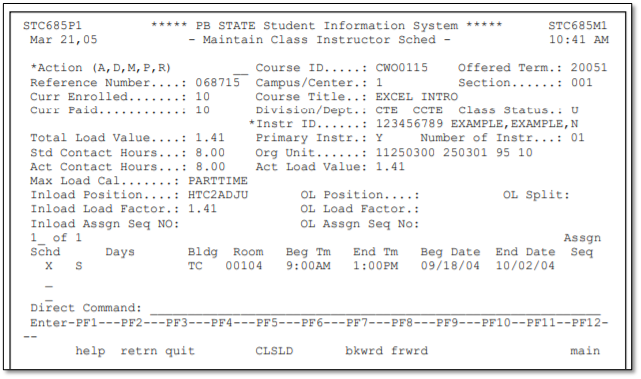
- Select the ACTION CODE: R (replace); press the <TAB> key
- On the field INSTR ID, press the <F1> key and select the appropriate instructor; if the instructor on the form is not listed, then the instructor has not been approved through Instructor Resource Management to teach the class and the class must remain TBA.
- If the instructor’s name is found, move your cursor and place it on the same line as the instructor’s name and press <ENTER>. Press <ENTER> again to replace the instructor. (For detailed instructions on how to replace an existing instructor once assigned, please refer to Specialized Procedures for Credit and Non-Credit Classes.
That’s It – You Have Now Successfully Loaded a Non-Credit Class Schedule!