Specialized Procedures for Credit and Noncredit Classes
How to Replace an Instructor
The PantherNet system allows you to replace an instructor on a class with another instructor or change the instructor to TBA. Please note that the procedure outlined here must only be used if the instructor being replaced has not taught any hours of the class. If the instructor has taught some hours of the class but someone else is finishing the class, refer to “Assigning Multiple Instructors” below.
Credit Direct Command: CU CC MC
Noncredit Direct Command:CU CC MN
- Find the class schedule you need to change by using browse or typing in the reference number.
- Change the ACTION CODE field to M (modify)
- Tab to the MORE field; type “Y” in that field and press< ENTER>.
- A screen will appear (Figure 13) that shows all instructors currently assigned to that class; move your cursor to the line adjacent to the instructor you wish to replace and place an “R” in that field. This can be a person’s name or a TBA instructor.
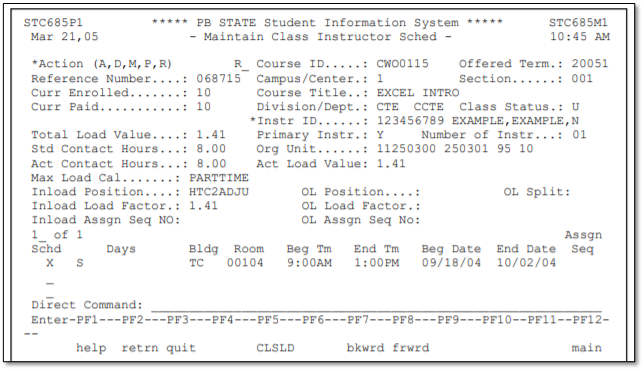
- The Maintain Class Instructor Screen is displayed (Figure 14); tab to the INSTR ID field and select another instructor or change the field to TBA by clearing the field using the <END> key and typing TBA.
Figure 13 – Browse on Class Instructors
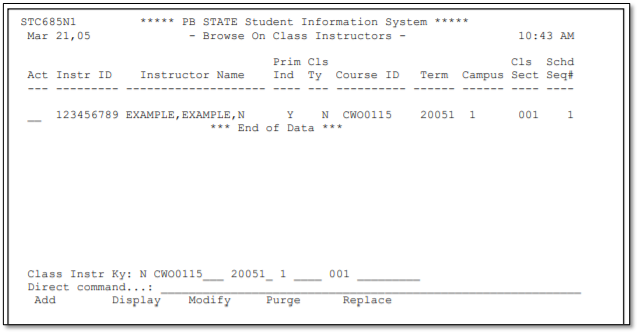
Figure 14 – Maintain Class Instructor
Assigning Multiple Instructors to a Class
There are many instances in which you will need to have more than one person assigned to a class: team-teaching (more than one person teaching at the same time), multiple instructors (when several different people teach parts of the course) or when an instructor is replaced after having taught some hours in the class.
Credit Direct Command: CU CC MC
Noncredit Direct Command: CU CC MN
- Find the class schedule you need to change by using browse or typing in the reference number.
- Change the ACTION CODE field to M (modify)
- Tab to the MORE field; type “Y” in that field and press enter.
- A screen will appear (Figure 13) that shows all instructors currently assigned to that class; move your cursor to the line adjacent to the instructor you wish to replace and place an “A” in that field. This can be a person’s name or a TBA instructor.
- The Maintain Class Instructor Screen is displayed (Figure 14). On the field INSTR ID, press the <F1> key and select the appropriate instructor.
- If the instructor’s name is found, move your cursor and place it on the same line as the instructor’s name and press <ENTER>. Press <ENTER> again to add the instructor.
- Only one instructor can be the “primary” instructor (instructor of record). If you want the person who was originally assigned the class to the primary instructor, press<ENTER> to finish the transaction. If you want the additional added instructor to be the primary instructor, tab to the PRIMARY INSTR field on (Figure 14) and type a “Y” in the field.
- The last step is to select the standard days and times of the original class schedule or select the actual days that the secondary instructor is teaching. For example, a secondary instructor may be teaching on Wednesdays of a Monday- Wednesday class. If you want to select the default schedule, place and “X” on the line next to the schedule (Figure 14). If you want to create a specialized schedule, type in the days and dates that the secondary instructor is teaching.
- Remember to adjust faculty loads (if required) through the IRM process outlined Section E of this manual.
Removing an Instructor from a Multiple Instructor Class
If you need to remove an instructor from a class, follow the procedure below. Please note that an instructor should not be removed from a class if they have been paid any money associated with the course. An instructor should only be removed if they did not teach any hours of the course.
- Find the class schedule you need to change by using browse or typing in the reference number.
- Change the ACTION CODE field to “M” (modify)
- Tab to the MORE field; type “Y” in that field and press enter.
- A screen will appear (Figure 13) that shows all instructors currently assigned to that class; move your cursor to the line adjacent to the instructor you wish to remove and type a “P” (purge).
- The Maintain Class Instructor Screen is displayed (Figure 14). The instructor you wish to purge is displayed on the screen, press <ENTER> to confirm the purge. Please note that you cannot purge a primary instructor when other instructors are attached to the class.
- Remember to adjust faculty loads (if applicable) through the IRM process outlines in Section E of this manual.
Scheduling Rooms for e-Learning Courses
Some e-Learning courses only meet a few times during the semester on campus. These rooms can be reserved through class loading.
To reserve rooms for specific days, follow the example below:
- Type in all required class information
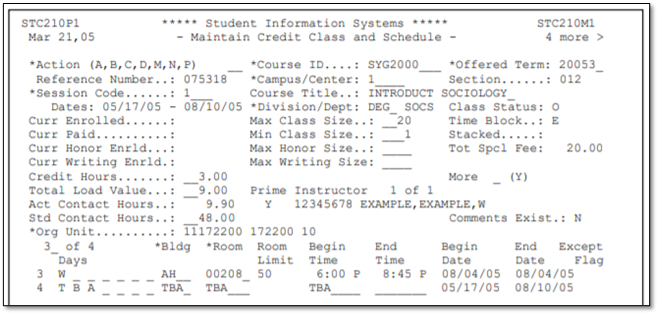
- In the bottom of the schedule, on line 1, type in the building, room, begin time, end time, and dates of the first meeting. Continue using as many schedule lines as are necessary to schedule all needed class meetings.
- When all class meetings have been entered, add one additional schedule line with TBA in days, TBA in building and room, TBA in time and the full class begin and end dates.
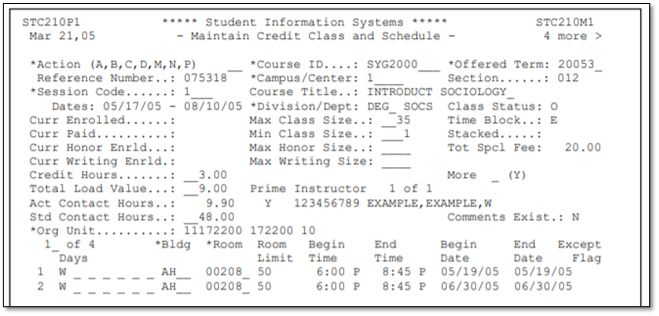
Figure 15 – Scheduling e-Learning that meets at least one time on campus
All rooms have now been reserved on the days and times needed for the e-Learning class. It is critical that e-Learning courses be scheduled in this manner for state reporting purposes. Please use the appropriate special designator code to indicate what type of e-Learning class is being held or see Section D of this manual for detailed instructions on e-Learning.
Special Procedures for using Student Email Address in Classes
Credit Classes:
Palm Beach State College added an additional field on panel 2 that controls the type of student email address used on a class. The default email address for students in credit classes is “IN” for Institutional Email Address (Palm Beach State assigned student email address). The email address for students may be changed to “PR” for personal email address with permission of the appropriate academic dean or their designee. Value can only be changed if no students have registered for class.
Noncredit Classes:
Palm Beach State College added an additional field on panel 2 that controls the type of student email address used on a class. The default email address for students in noncredit classes is “PR” for personal email address. The email address for students may be changed to “IN” for Institutional Email Address (Palm Beach State assigned student email address) with permission of the appropriate academic dean or their designee. Value can only be changed if no students have registered for class.