Credit Class Scheduling
Below is an overview of each of the panels:
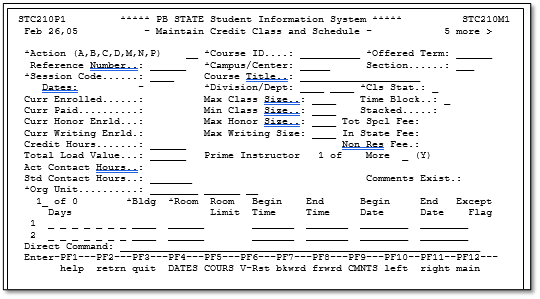
Panel 1 – This is the primary entry panel where most information is entered such as the course number, campus, session, account number, facility and room, times and dates.
Panel 2 – This is the panel where special designators, subject areas, and schedule notes are added
Panel 3 – Special Fees
Panel 4 – “Stacked” (concurrent) classes
Panel 5 – Detail facility and room coding and class schedule exceptions
Creating a Credit Class Schedule On-line
What you’ll need to complete the task:
Completed Credit Class and Schedule Add/Modify/Purge Form (as developed at the individual campus level)
Figure 1 – Panel 1 - Primary Entry Panel for Credit Classes
Step-by-Step Instructions for Adding a New Section of a Credit Course
Fields for Entry
The following fields need to be entered in the order given:
Direct Command: CU CC MC
- Select the ACTION CODE: A (Add)
- Course ID – Type the course ID (course number) of the course to be loaded, press the <TAB> key.
- Offered Term – Type the term identifier for the class, press the <TAB> key.
- Campus/Center – Select or type the appropriate campus that is offering the class (Note: if the class is being offered off-site, select the appropriate off-site number for the sponsoring campus. It will end in a 9).
- Press the <F5> key to load the course dictionary information. Press the <TAB> key five times.
- Session Code – Select or type the appropriate session that the class is being held in (e.g., Main, Express, 12-week). Please see Section D of this manual for detailed instructions on selecting a session. Press the <TAB> key.
- Division/Dept – No changes are needed; press <TAB> key twice.
- Class Status – The default value is “O” for open. If you temporarily do not want enrollments in the class, change this value to “H” for hold. Do not change to “U” for unavailable (class add date has passed) – the system will automatically update this field to “U” when the drop/add period for the class has expired. To cancel a class, change to “C” for cancel. Press the <TAB> key.
- Max Class Size – Enter the maximum class size (class limits). Please see the academic affairs class size guidelines policy manual in Section G of this manual for the assigned class size. This will later edit against the facility and room you have chosen to see if the room can meet this capacity.
- Time Block – This field will automatically be filled-in when the times are entered. The values are “D” for day, “E” for evening, “W” for weekend and “O” for other (classes with TBA in time). Note: Classes that start at 5:00 p.m. Monday through Thursday are labeled as “E” Evening; classes that begin at 5:00PM on Friday are labeled as “W” Weekend). For fully online classes, enter a “V” in this field – this will load the information on Days, Bldg./Room and Time automatically. Press the <TAB> key.
- Min Class Size – The default value is 1; enter a different minimum class size if appropriate. Press the <TAB> key.
- Max Honor Size – Enter the maximum number of honors students for this class (if applicable – only used for Honors Sections); press the <TAB> key.
- Max Writing Size – This field is currently not used; press the <TAB> key.
- Credit Hours – no changes are necessary in this field; press the <TAB> key.
- Load Value – this field is the equivalent of “points” for instructor load, and is loaded from the course dictionary – no changes are needed; press the <TAB> key
- STD Contact Hours – These are the standard class hours from the course dictionary (e.g., one credit hour=16 contact hours). Remember that each hour in credit is actually 50 minutes; press the <TAB> key.
- Org Unit – This is the organizational unit account number to which course costs will be charged. The account and qual-1 are automatically loaded from the course dictionary record. Type in the correct campus number. Press the <TAB> key 4 times.
- Days – Type in the days of the week that the class will be held, using the following abbreviations:
M (Monday)
|
T (Tuesday)
|
W (Wednesday)
|
R (Thursday)
|
F (Friday)
|
S (Saturday)
|
| U (Sunday) |
If the class is held on different times on different days, you can use the additional lines provided. If the class is TBA on the day field, type TBA in the first three positions for the days. For a fully online class, once the V is entered on Time Block, this field will display as ONLINE. Please remember that you cannot use TBA in days if you are using a “special” session (see Section D for details). Tab to the “BLDG” field.
- BLDG – Type in the letter designator for the building you are choosing. If the class building is TBA, type TBA on the building designator and room. Press the <TAB> key.
- Room – Type in the room number. If the building is TBA, room field must also be TBA. Press the <TAB> key.
- Begin Time – Enter the begin time for the class. The format for time entry is abbreviated such as 7P for 7:00 p.m. or 820A for 8:20 a.m. If time is TBA, type “TBA” in begin time field. Please remember that you cannot use TBA in times if you are using a “special” session (see Section D). Press the <TAB> key.
- End Time – Enter the end time for the class. If the class start time is TBA, leave this field blank.
Do not press enter until you have checked to see if the class needs any additional panels of information filled in.