Creating Course Section with Different Start/End Dates from the Academic Period
Workday allows course sections to be created outside the academic periods if the course section falls within the standard academic period (provided at the end of this section). When course sections are created with different start/end dates, it is important to also update date controls on course sections. To change the date controls, an integration must be run to update the date controls. The integration is a manual process that is processed off of course section tags. It is important to remember that just putting a course section tag does not automatically update the date controls AND if you end up changing the dates of the course, it is important to alert Susan Bierster (for now) to re-run the integration to update the date controls based on these new start/end dates. CCP typically needs this flexibility; however, there are times with clustered course sections, credit courses may also need to follow this process. To create sections with different start and end dates:
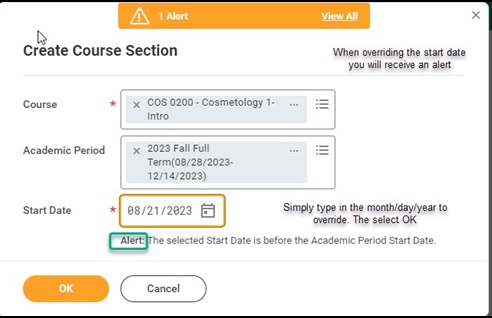
1. Choose the Full Term Academic Period (Ex: 2023 Fall Full) and then override the start date.
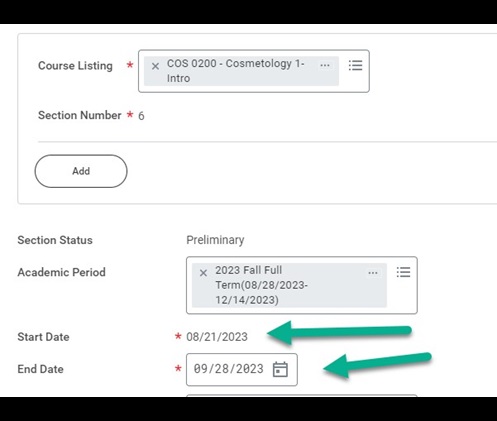
2. If the end date of the course section needs to change, on the next screen, you can override the end date by adding the month/day/year.
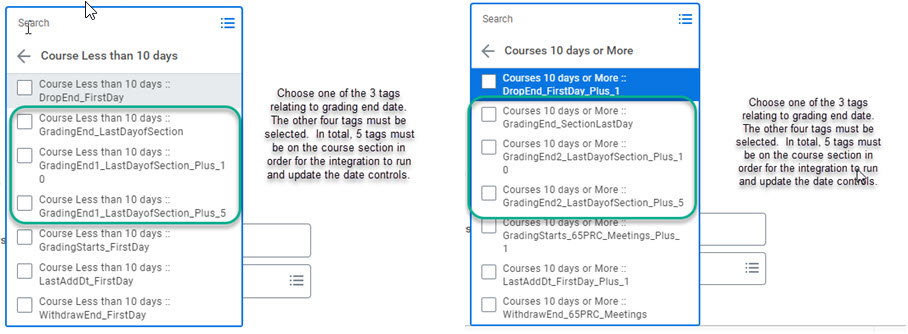
3. When changing the start and/or end date of a course section, it is important to add specific course section tags that are used in an integration to change specific date controls on the course section.
There are two categories of date controls:
1. Courses less than 10 days
2. Courses 10 days or more
Below is a listing of the course section date controls. Please note – there are 5 unique tags on the course section. There are 3 tags relating to grade due date and you only pick one of the tags related to grading.
Examples of date controls that need to be changed when start and/or end dates do not match the academic period: Drop/add, withdrawal, grade due date.
Standard Academic Periods
Fall: August 15th – December 31st
Spring: January 1st – May 14th
Summer: May 15th – August 14th
Creating Course Sections
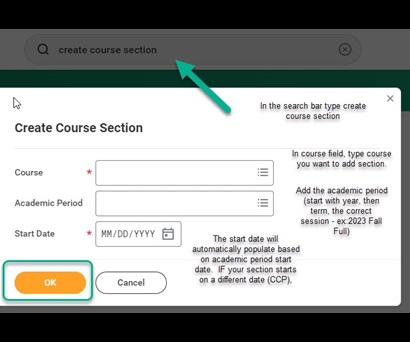
In the search bar at the top of your homepage, type “Create Course Section” or use abbreviation “Cre Cou Sec” and click on Create Course Section – Task when it appears.
Once you access the Create Course Section - Task, follow the below steps:
- Complete the following fields:
- Course: Type the course number (make sure to leave a space between the alpha letters and numbers). The course number should auto populate BUT if several course numbers show up, please select the appropriate course.
- Academic Period: Type the Academic Period (Ex: 2023 Fall or 2023 Fall Full) the course section will be offered in, press enter and click on desired option (Full, Express A, B, or 12 week).
- Start Date: will auto populate with start date of Academic Period selected. Note: CCP courses will usually have a different start date, so it is important to make the change to the start date NOW before advancing to the next screen.
- Click OK at the bottom of the page.

- Complete the following fields:
- Allowed Grading Bases: There should be only one selection. If you have two or more, please remove the grading bases that do not apply to the course. You can contact Academic Services for assistance if you do not know which one is correct.
- Eligibility Rule: Auto-populates – do not remove. IF and only IF you have a special reason to change the rule, then do so. This would be for Honors courses and/or Dual Enrollment at the High School. Eligibility rules are considered prerequisites and/or corequisites and/or special designators that control enrollment. Removing the rule will remove any barrier to students enrolling.
- Section Capacity: Enter capacity (seats) for section. Currently it is prepopulated for 100.
d. Private Notes: Only staff can see private notes so you can use this for any information you need but don’t want students to view.
e. Public Notes: Students and staff can view these notes. This should be used for any course notes needed for the student. Examples: Notes for Online, Hybrid, Live Online or any special notes the instructor may require.
f. Course Section Tags: Honors, Dual Enrollment at High School, etc. This is a multiselect field, select all that apply. For CCP course sections or any course section in which you are changing the start and/or end date to a date outside the academic period, please see the section below: Creating Course Sections with different Start or End dates from the Academic period.
g. Published Instructor Roles: Primary Instructor auto-populates. If you want secondary instructor to appear in searches or for students to see, you will then have to select secondary instructor in this field.
h. Delivery Mode: Select the single option that applies.
(EX: Hybrid, Online, In Person, Live Online)
i. Instructor Role: Click the Plus sign (+) to add a row.
- In the Role column, click the dropdown and select Instructor.
- If you have multiple instructors, click the plus sign a few times, then in the top row, select primary instructor and for the rows below choose secondary instructor.
- In the Instructor column, type the instructor’s name and press enter, or click the dropdown and scroll to find the desired instructor.
j. Section Components: This will depend on if the course is In Person, Hybrid, Live Online. Click the Plus sign (+) to add a row.
IN PERSON/Hybrid/Live Online
a. In the meeting pattern column:
1. Click the dropdown menu, click ALL, select the day combination (Mon/Wed), then select a day/time combination (Mon/Wed 8:00AM-8:55AM). If the days/times are not available, you will have to create a custom meeting pattern. See below on how to create custom meeting patterns.
2. In the location column: select the building/room by selecting All Locations and scrolling OR enter the building/room code (EX: ETA 0220). For Live Online – select the campus location.
ONLINE:
a. In the meeting pattern column: Leave blank.
b. In the location column: select the campus from the dropdown menu.
4. Click OK at the bottom of the page.
NOTE: EVERY course section MUST have a location assigned – either building/room or Campus. When you leave location blank, it impacts reports. No blank/orphan sections allowed.
Edit Course Sections
Once a course section is created or rolled over, you may need to go in and edit the course section. Examples of what you may edit on a course section - add a faculty, change a room, add notes, update pay methods. To find the course section to edit, you have choices, and it would be what you are most comfortable with. Below is a standard way to search for the course section.
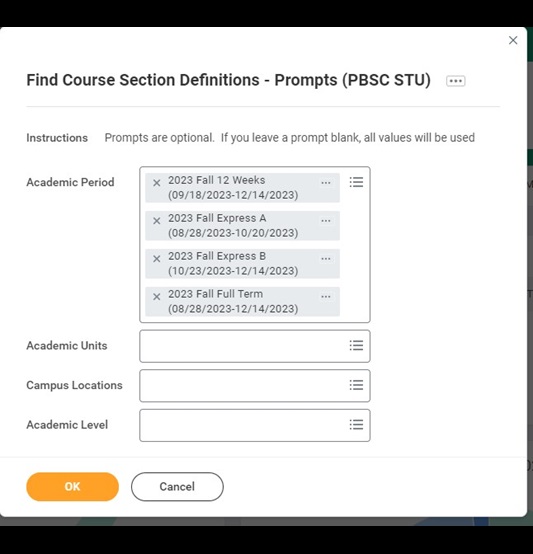
Go to the Academic Management Dashboard and under Enrollment Data and Reports, choose
Find Course Section Definitions – Prompts (PBSC STU).
1. Type the academic period you are searching for to edit the section. HINT: Type the year and then the academic period. Keep your search as wide open as possible and don’t choose campus, academic unit or level.
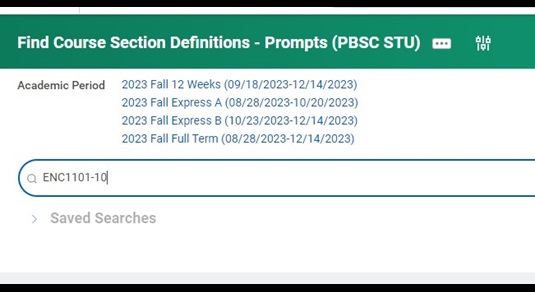
2. Filter the results further by typing the course number and/or course number and section (EX: ENC1101 OR ENC1101-10) in the search bar.
3. Click on the Related Actions button (twinkie) beside the desired course section, hover over Course Section Definition and click on Edit.
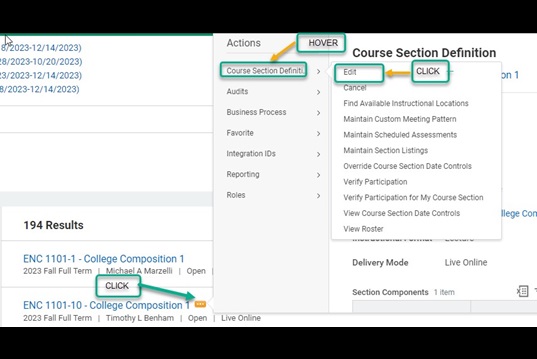
4. Make the desired edits. Click Submit to complete the editing.